
Trending
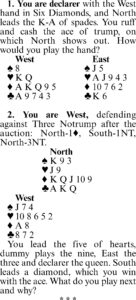
You lead the five of hearts, dummy plays the nine, East the three and declarer the queen. South leads a diamond, which you win with the ace. What do you play next and why?
* * *
1. To try to ruff a club in dummy by playing the K-A and another club would subject you to a possible overruff if South started with a doubleton (or singleton) club.
A much safer method of play is to cash the K-Q of hearts. Once you get by this hurdle (the chance of South having one or no hearts is relatively small), you lead a club to the king and start to run dummy's hearts. If South ruffs at any point, you overruff and draw his remaining trumps to score the rest of the tricks. If South discards as dummy's hearts are led, you finish by taking a trump finesse to make the slam.
2. The only play that has any chance to defeat the contract is the jack of spades. You know from the play to the first trick, where partner could not beat dummy's nine, that declarer has the A-K-Q of hearts. You therefore can't afford to play another heart, because declarer will then score three hearts, four diamonds and three clubs to finish with 10 tricks. What you hope is that South has something like:
[S] 8 5 2
[H] A K Q
[D] 7 4 2
[C] 10 9 6 5
It is known from the bidding that South does not have the ace or queen of spades, since he would not have bid one notrump (six to 10 points) if he had either of those cards plus the A-K-Q of hearts. Your only real hope, therefore, is that partner has four or five spades headed by the A-Q-10. Note that a low spade return would not succeed in that case, since declarer would play low from dummy to safeguard his contract.
Tomorrow: One up from down under.