Bridge by Steve Becker
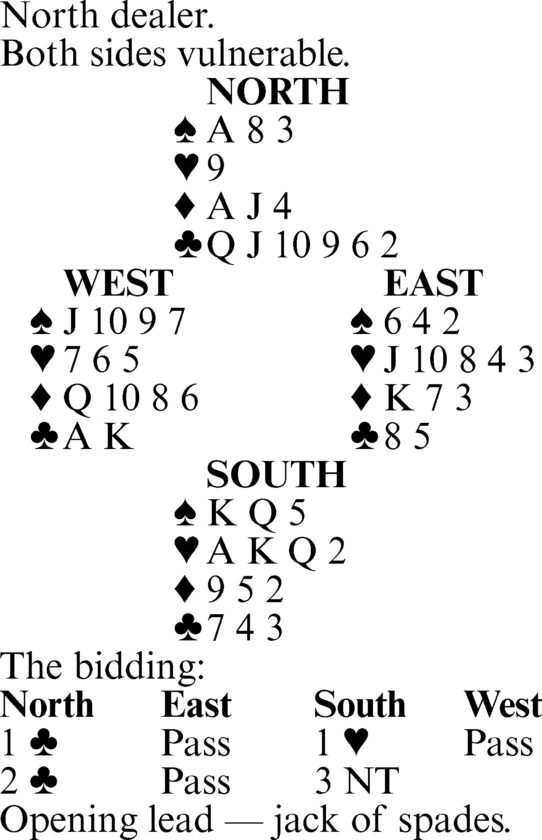
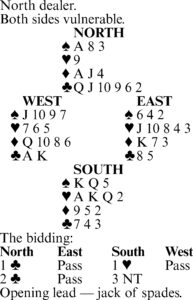
Assume you’re West, defending against three notrump, and that you can see only dummy’s hand and your own. Declarer wins your spade lead with the king, partner playing the deuce, and returns a club, which you win with the king. What would you play now?
Actually, there’s only one right play — the ten of diamonds! If you lead it, South goes down; if you don’t, South makes the contract.
If declarer goes up with the ace, you score three diamond tricks and the A-K of clubs. If declarer covers the ten with the jack, East wins with the king and returns the seven, allowing you to force out the ace. If declarer ducks the ten, so does East, and a low diamond continuation (on which partner plays the king regardless of what declarer plays from dummy) establishes the two additional diamond tricks you need to set the contract.
Note, however, that if you lead the six of diamonds at trick three, South plays low from dummy and makes four notrump.
How can you know that the ten of diamonds is the right play? Well, look at it this way: After studying dummy, you can count eight tricks for declarer — three spades, a diamond and four clubs — and, considering the bidding, he is sure to have a ninth trick somewhere in his hand if you simply stand pat and allow him to finish establishing dummy’s clubs.
Thus, if you make the “safe” lead of the ten of spades, you will almost surely hand South the contract. Instead, you must attack immediately to have any chance of success, and declarer’s only possible weak spot is diamonds. You therefore exploit this possibility, hoping to find partner with the king, while at the same time taking care to lead the ten in case South has the nine.
Tomorrow: Trump mismanagement.
Lifestyles
HINTS FROM HELOISE: Grab back scratcher for all items hard to reach
DEAR HELOISE: I’ve been reading your (and previously your mother’s) column since I was in grade school. I’m ...
Man makes ‘legend dairy’ climb in Colorado
DENVER — Hikers who climbed a Colorado mountain got more than just a sweeping view at the top. A man in an ice ...
TO YOUR GOOD HEALTH: Rare liver disease can be difficult to treat
DEAR DR. ROACH: Our son passed away at 38 years old this past December with an end-stage alcohol-related liver ...
Tannin essential for long-lived red wines
In nearly every question-and-answer session following a wine appreciation class, questions like, “What makes ...
Wednesday evening TV listings
Wednesday evening TV listings