
Trending
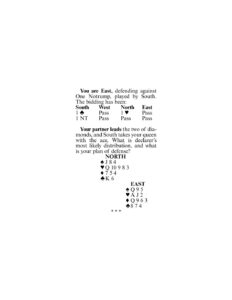
Let's first try to work out South's distribution. To begin with, you consider the suit your partner led. Since there is no reason to think West chose an irregular lead, you assume the deuce was his fourth-best diamond. This means that South started with precisely two diamonds.
Next, let's turn to the suit declarer bid — clubs. He can't very well have six of them, since he would almost surely have rebid his clubs rather than bid one notrump. It is therefore reasonable to assume that South started with four or five clubs in addition to his two diamonds.
Now, taking the bidding one step further, let's examine South's one notrump rebid, which denied four spades as well as four-card heart support. Since South can't have four cards in either major, his distribution must be exactly 3-3-2-5.
The quality of declarer's suits is also subject to partial analysis. He is unlikely to have three hearts to the king because he might have raised his partner to two hearts with K-x-x and a doubleton diamond. South is therefore likely to have a hand similar to one of these two:
[S] A K 7[S] A 10 2
[H] 6 5 4 [H] 6 5 4
[D] A 10 [D] A 10
[C] Q J 10 9 2 [C] A J 9 5 2
So, though we are still only at trick one, it seems probable that West will shortly win a club trick and play three rounds of diamonds, leaving you on lead with the nine. At that point, you plan to lead a low heart to partner's king and win the next two hearts with the A-J to put the contract down one.
Tomorrow: The best-laid plans may go awry.